Showing posts with label Sketches. Show all posts

Thursday, July 3, 2014

My First Published Layout!

I am officially a published scrapbooker!  Yahoo!

Fifteen years of scrapbooking.
Numerous tries.
Many rejections.
 
You will find me on page 205 in the June Issue of Scrapbook Generation's CREATE magazine.

Only one teeny, weeny, itsy, bitsy problem…
...they spelled my name wrong!  
Ack!  
Oh well, any press is good press, right?

I seriously could not be any happier!  It's a great feeling to see your work in a magazine!  Even if they're not really printed anymore...

Here is the LO in all of its glory:
I remember Gavin’s 3-month photo shoot…trying so hard to capture his new baby grin and new emerging personality and his first "tummy" pose.  So, when I was finally able to get it scrapbooked, my mission was exactly the same.  Imagine my delight when I found baby boy papers/stickers to match the stuffed-monkey-growth-measuring animal we’d been using all these months!

The LO was actually based on the April, 2014 Scrapbook Generation sketch.  They release new, FREE sketches every month.  I simply answered the call for submission.
Take a closer look at the detail:
Is that hand stitching you ask?  Yes.  It.  Is.  Painstakingly poked, threaded and stitched with three-ply embroidery floss.  But, I love the dimension it adds to the LO and it is so perfect for a kid-themed project.  If you are as old as me, you might remember the yarn stitching cards we practiced on when we were kids...with a giant needle!

I have mentioned plenty of times how much I love Scrapbook Generation Sketches/Books.  They really help me when my creativity goes on hiatus.

Most of the products I used were from Doodlebug Design (they make the cutest darn kid products -- bar none).
 
Products I used:
  • Snips & Snails Icons cardstock stickers
  • Snips & Snails Cute Cuts cardstock die cuts
  • Snips & Snails Cardstock:
    • Monkey Business
    • Nursery Stripe
  • Bazzill Cardstock
  • Fancy Pants Royal Blue Large alpha stickers

Now, I just need to do the LO's for Gavin's 4 month shoot, 5 month, 6 month, One! etc. 
Get the picture?

Have a very safe and happy 4th of July!  See you on the flipside.

Wednesday, June 25, 2014

Niagara Falls

Well, what a neglected blog this is!!  I haven't posted in over two months...I've been a bit busy, I guess.

What's been going on here, you ask?  It'll take more than one blog post to catch up...but here's a start.

May was just so darn hectic!  We have three birthdays between April 22 and May 15, and Mother's Day was just four days before my birthday!  I really do like to celebrate my birthday all month long. For me, it isn't really a birth "day" -- it's more like a birthday "month." (Oh, my poor family!)  We had loads of dinners, presents and cake...and then just a week later...we went to Mexico!  A family-reunion-kind-of trip (more on that later)...which takes me right to June. 

June is just as busy!  We've got a one-year old!  Yessirree!

I did manage to squeeze in some cropping on National Scrapbook Day (5/3).  Spent the day with two of my dear scrapbook pals and managed to get 22 LO's completed.  I've got loads to share.

I am trying to go backwards and fill in some of the "holes" that are missing in my chronological scrapbooks. Our 2011 trip to Niagara Falls has a 100-page digital scrapbook, but it needed a traditional layout too! Celebrating our milestone anniversary was very special.  It needed to be memorialized, traditionally.  If you have not been to see the falls, I highly recommend you add it to your bucket list.
I based my layout on this sketch from Let's Scrap:
You will notice that the main photo of the sketch was designed to stretch across the two pages.  It could have easily been two, square photos, but I am totally fine with cutting my photo!  Panoramic photos are perfect for this technique!
 
The entire LO was made with the beautiful products from the Enchanted line by Creative Memories. So very sad to see this company go out of business.  I wish you could feel the raised embossing on the printed paper.  The ink splatters are printed on the paper, but it sure looks like I spent hours doing that...and no mess! I will be very stingy with the remaining product I still have in my stash.

Here is a closer look at the dimension and beauty of this line:
Thanks for dropping by...my next scrapbook LO I plan to share has been featured in a magazine!  Yes, that's right.  I've been published!  Woot!  Woot!  

Monday, February 24, 2014

Tiggerific

Thought I would share a fun layout I completed at my mountain retreat last month.  It's really fun to create a layout with such cute paper & stickers...and of course, the cute subject!
Gavin showed up one day wearing this cute Tigger sleep-n-play outfit and it wasn't even Halloween!  And, yes...he was little.  Only three months old at the time (you caught me...a little behind in my scrapbooking). But, I don't care.  I enjoy working with photos of him at any age (and he's only 8 1/2 months old now).  So, cool it.

Once again, I started with a sketch.  This one is from Let's Scrap:
A closer look:
 
I did have to manipulate the sketch a bit to fit the format of my photos.  The main photo is horizontal and I wanted to use 4" square photos on the left.  I searched for some cute Tigger quotes on the internet and added the orange text to my main photo in Photoshop.  I also changed up the right side a bit.  Instead of five square photos, I used three, two of which are 3" x 4" verticals.

The Tigger paper and the stickers are from Sandylion.  The stickers have a clear background (love that!), and I hope you can see the shimmer.

The chevrons were fussy cut from two different colored MME chevron papers.

The ribbon is from American Crafts (attached with my Tiny Attacher) and the cardstock is a mish/mash from my stash (hey, new rhyme theme there!).

The black stitching under the title is simply a black pen used to create movement across the page. This is a very old technique (from my beginner days).  Resurrected!

Absitively,
posolutely,
splendiferous!

Friday, November 22, 2013

Weekly Layout

This week I am sharing a layout about last year's Race for the Cure. Posting this particular layout shows the world that I am 13 months behind in my scrapbooking!  I have pics from the 2013 RFTC as well!  Oh me.

Here's the LO:
 It is based on this past week's sketch @ Let's Scrap:
Yes.  This LO has lots of Pink!  That's okay.  I LOVE PINK!

The Race for the Cure is a big deal for me.  You can read more about the event here.

You will notice that the journaling was copied exactly from the blog post; which I just realized, helps immensely when you are behind in your scrapbooking.  I did not have to rely on my memory. 

I built this LO around the 12" x 12" white FINISH line image from a Cricut cut long ago.  It is actually the leftover/negative paper/pieces (yes, I may have a problem throwing away anything!).  It worked perfectly for this LO and the sketch.  However, I did have to re-arrange the right side of the sketch to make it work. 

I built the entire LO as one big 12" x 24" piece of art. When it was complete, I simply sliced it down the middle!  Yep. Cut right through the pics and the journaling!

I want to show you some of the close-up detail of the LO:
The patterned background paper was a pretty good match, but it needed something to set it apart.  I distressed and sanded the edges.

I hope you can see the glitter-y images!  The "survivor" photo on the rh side is matted with the pink glitter paper and the white patterned pink ribbon paper at the bottom is splattered with glitter!  You will also notice that the big pink ribbon in the center is embossed with silver foil.  The "cure" is from the same set and they are both mounted on pop dots.

After I had the entire LO assembled, I thought that the pink background paper was a bit boring and just too much pink.  So, I had to mask off my photos and embellishments and stamp over a completed LO!  Well...that's sure Not easy!  I actually stamped with a white pigment ink, but the cardstock just soaked it up!  I'm happy with the resulting subtlety it left behind.

I was able to find some pink alphas that matched.  They almost look as though they were cut out from the white cardstock.  All of the different stacked dimensions made for an interesting title.  

Here are the products I used:
  • Pink Cardstock:  Coredinations Foundations
  • White Cardstock:  Creative Memories
  • Pink Alphas:  Basic Grey Euphoria
  • Pink Patterned Paper:  Creative Memories "Beautiful" Power Palette
  • White/Pink Ribbon paper:  Me and My Big Idea's
  • Pink Glitter Cardstock:  Best Creation
  • Race for the Cure Embellies:  Creative Memories
  • Chevron Stamp:  Stampin' Up Positively Chevron
  • White Pigment Ink:  ColorBox Frost White
  • Twine: Queen & Co.

Thursday, November 14, 2013

Weekly Layout

This week, I'm posting a newly finished layout of some old pictures (March 30, 2012 to be exact). I still had long hair!

I was newly elected to the Design Team @ Let's Scrap and I needed a headshot.  Gosh, I hadn't had pictures taken of myself in quite some time.  Could have been my senior pictures from way back in 19__ (I ain't telling!).  Was kinda fun, but kinda odd being on that side of the lens.  I was caught talking in several of the outtakes...seems I was giving photography lessons to Bill.  :-)
Scrapbooking them was a bit odd.  Anyone else find it hard to memorialize one's own pictures?  A bit self-indulgent.
The sketch I used is from Scrapbook Generation.  It is not followed exactly.  My picture dimensions were a bit bigger, and I moved the journaling to the bottom left.
A closer look:
  
Products Used:
  • Textured cardstock:  Bazzill Sparkle
  • Alphas:  American Crafts Thickers:  Vanilla, Hugs & Togetherness
  • Patterned paper: 
    • My Mind's Eye:  Collectable "Wonder" Lovely
    • My Mind's Eye:  Lost & Found Two "Sunshine" Adore
    • My Mind's Eye:  Miss Caroline Curious Planks
  • Embellishments: 
    • Stickers:  My Mind's Eye: Lost and Found 3
    • Chipboard:  My Mind's Eye:  Lost and Found 3
    • Brads:  My Mind's Eye:  Lost and Found Two
I love My Mind's Eye "glittered" products!  They are definitely a fav of mine. 

Friday, September 20, 2013

Weekly Layout

As I reported on Monday, the historic flooding has definitely changed the history books in Colorado.  It is truly a great pleasure to live in such a beautiful state with huge Rocky Mountains, smaller foothills, and a rolling landscape, but living with such beauty brings big risks.  People choose to live in the quaint, beautiful mountain towns...and every 500 years or so come record-breaking floods.  Or fires.  We've definitely had our share.  Is something wrong with the planet?

Again...we are FINE!  We had no water damage at our house, but others are not so lucky.  Entire towns have been condemned.  Some aren't expected to "re-open" for six months.  Others have no way in and no way out...and no flood insurance!  It is expected that 200 miles of roadways need to be rebuilt and over 30 bridges repaired and/or fixed...all before our first snow storms of the season arrive in about 4-6 weeks.   Our beautiful Colorado landscape has forever been changed.

On a more happier, fun note, I wanted to post this week's layout.
Yes, we have our very own toddler.  She is such a lively dog.  So playful and fun loving.  I wanted the LO to be just that.  Gracie brings so much laughter and happiness to our house.  I can't imagine our lives without her.

It is based on this sketch from Scrapbook Generation.
Some closer-up detail:
I hope you can see the textures on this layout!  From the textured orange cardstock to the rough feel of the "two" paper to the layered #2 candle!  Doesn't it look so much like the real one?  As is getting pretty normal for me, the title and the #2 candle were cut with my Silhouette Cameo.  I layered on some bling to mimic the dots.
 
The Scrapbook Expo is in town today and tomorrow.  That's where you'll find me...

Monday, September 9, 2013

Weekly Layout

Hello Monday!

I have just one layout to share this week (although I did get a lot of pictures printed and put into TWO project life books over the weekend!).  I still have so many projects going on...

This is the current sketch @ Let's Scrap:
And, here is my take on it:
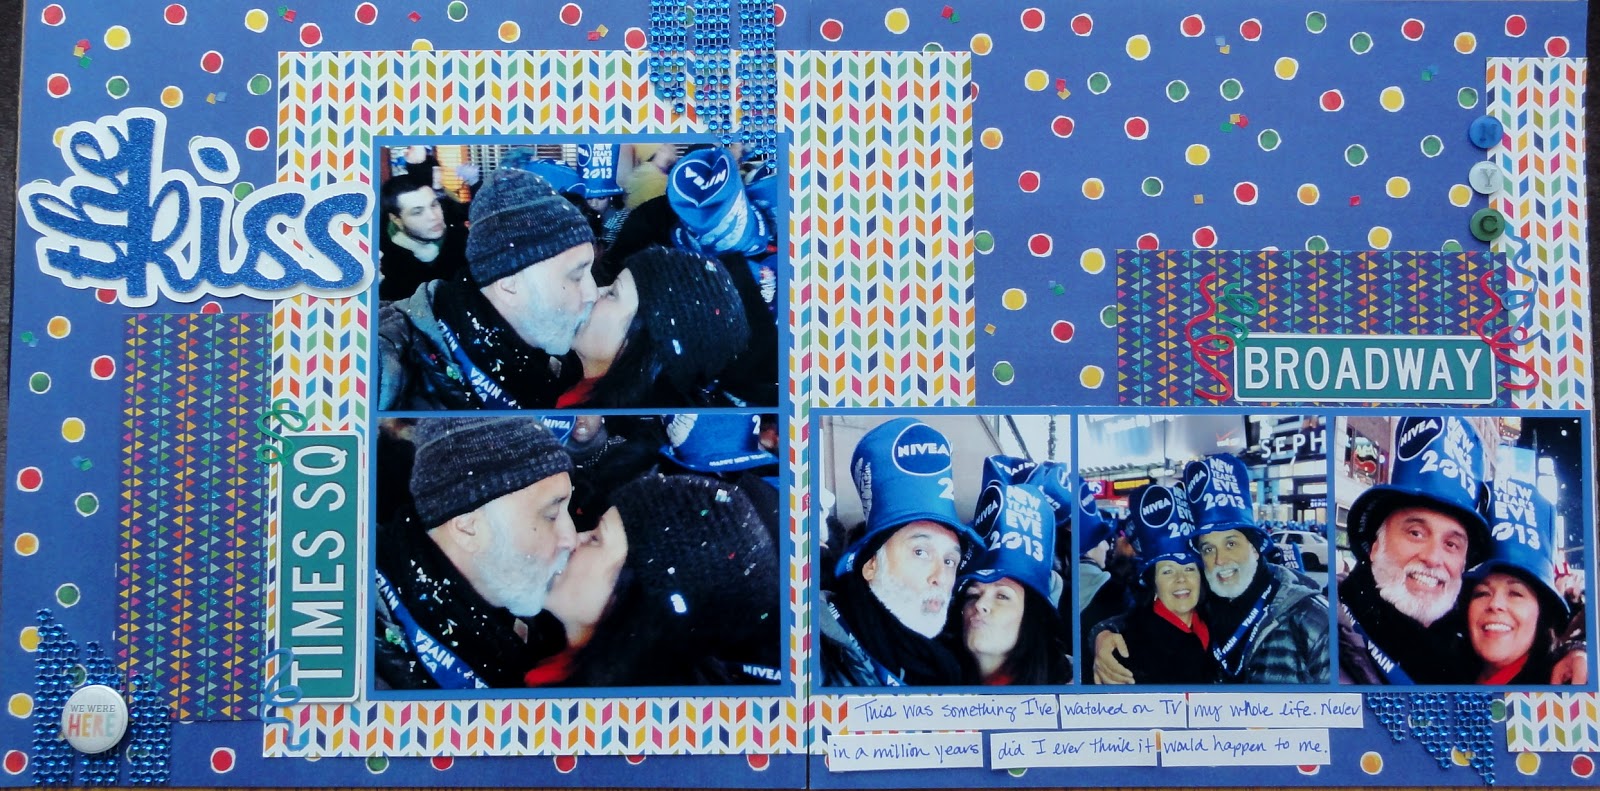
This is just one of several LO's I will preserve from watching the ball drop in New York City this past New Years Eve.  It was such a big event for me.  It will take many pages to give it the proper prominence and emphasis in the 'ole scrapbook!

Most of the pictures are iphone pics so they are a bit grainy.  And, with the confetti floating in the air, it was hard to get a good shot.  I have to just say to myself, THESE PHOTOS ARE GOOD ENOUGH! 

Here's a closer look at some of the detail:
I really wanted this LO to mimic the Nivea blue of our hats and the lively lights of Times  Square.  After all, the company throws lip balm to the crowd along with those famous hats! 
 
I don't know if you can tell, how shimmery the LO really is:
  • The self-made title is cut using the Silhouette Cameo from blue glitter paper. 
  • The bling comes in sheets and is sewn/woven together somehow.  I simply cut it into strips and adhered it with glue dots.
  • The top two patterned papers are from the American Crafts Margarita line (loved that one!).  The white paper has a raised chevron print and the blue triangles are glittered as well.
  • The street signs were made & printed from this website. I use it all the time!
Well, I feel a bit better about that trip.  At least two of the pages are done...

Thursday, September 5, 2013

Weekly Layouts

I thought I'd share two more recent layouts and my inspiration for each. 

The first is a layout from when we visited the world famous Maroon Bells a year ago!  It was our 21st anniversary weekend and we stopped to hike and enjoy the most photographed spot in Colorado. 
The sketch I used is from Scrapbook Generation.  When I saw the trees, I knew it would be perfect.  I absolutely love their sketch books, but you can also find some free sketches to download here:
 
I used the 3" x 3" photo blocks to showcase one panoramic photo.  I love taking panoramic shots and I sometimes find them hard to scrapbook.  So, I had to move the journaling strips, and that upper rh dead space was just begging for some embellishments!
 
And, no, I didn't hand cut all those trees.  They were done in a snap on the Silhouette Cameo.
We stayed at the Maroon Bells long enough to do some hiking.  So I had lots more photos of our day.  I decided another two pay layout would be perfect.  This one is a bit different for me.  The rh side is a 12" x 12" diecut from the Silhouette Cameo.  I'm loving these!  They are so easy to make.
There is solid cardstock backing the title box, and the trees are backed with a green wood grain patterned paper.  These brightly colored papers really complimented the photos!  No matting necessary.
 
The rh side is simply 4" x 6" and 3" x 4" photos placed in a straight grid style.  I didn't have a lot of room for embellishments, but added the compass and the mountains with pop dots.  The subtitle, word strips, and the hiking boots are stickers. 
Ever so slowly catching up.
 

Monday, August 26, 2013

Weekly Layouts

Wahoo!  I finally got some cropping time this past Saturday with a dear friend.  We spent 10 hours together at our LSS.  I finished 13 layouts.  Well almost.  Several of them need a tweak or two.  I thought I'd share some of them here over the next few weeks.

Since my cropping time is suddenly non-existent (hello, new grandson), it is more important than ever than I use the time wisely.  I chose to use sketches on all but two of the layouts, and on that one I used a 12 x 12 die cut overlay, that I'll share later.

I think it's important to use WHATEVER tools you have available to get the job done.  I really do love sketches.  I love recipes, but I also love that I can venture off and add/subtract or switch it up if I need.

(Whenever I share photos on ye 'ole blog, just click on them to see them bigger.)

First up is a layout from the Well Heeled breast cancer luncheon I attended last year.  What a hoot that turned out to be!  I actually walked the catwalk, modeled my shoes, and won...er, the shoes did.  They shoes stole the show, actually.
I added the program to the area where the sketch called for journaling.  Easy.  I also included my name tag with some cute washi tape.  The big journal box was computer generated and cut with a Spellbinders Label One die.
 
Glitter paper just doesn't photograph well, but it really sparkles.  The title and the pink ribbon accents were cut with my Silhouette Cameo.  Yep, cut through the glitter paper just like butter!  Of course, I needed to add the rhinestones to the shoe!  And, I added one of the accents directly to the top of a photo!
Here's the Let's Scrap inspiration.
4-10-13 Sketch
The second layout is April's Baby shower and it will go into Gavin's Project Life book.  I only used the left side of the sketch.  Instead of just one large photo, I grouped six photos together in PSE using a template and printed them as one large photo.
I just have to give you a close up shot of my title!  It was a baby t-shirt shape from the Silhouette store.  I added the Baby Shower text to the top.  I embellished the finished shirt with the blue footprint washi tape and a gingham bow.
 
It was based on this Let's Scrap sketch:
7-31-13 Sketch
And, finally, Baby Love.  These are the pictures from the "gender reveal" photoshoot I had with the kids just after we found out that we were indeed having a boy.
Again, the embellishments were cut on my Silhouette Cameo.  I added the blue sparkly accents with a Gelly Roll pen.  And, yes, all of the picture props and ideas were mine.  I tweaked some of the photos to black and white, and left only the props blue for emphasis.
Based on this Let's Scrap sketch:  I loved this sketch.  So super simple and such clean, straight lines.  I like those!
8-14-13 Sketch
Well, there you have it...five finished pages.  Done & documented.