


Just call me...
GRANDMA!!
|
Saturday, December 15, 2012

Thursday, December 6, 2012
Holiday Card Swap
Got your Holiday cards made yet? If not, read on for some inspiration.
I recently participated in my very first (homemade/handmade/unique/custom-designed) Holiday card swap. Let me just tell you...I was a nervous wreck! I tend to be a bit OCD over things like this. My cards have to be perfect!
I made 10 of these babies for the swap. They are not my Holiday card this year as I want to send out photo cards, but I will use these for thank you's and other holiday-related gift giving.
So I labored and labored over my design and came up with this card:

I am in love with the white-on-white layering seen all over Pinterest and decided to throw in a bit of Kraft-colored accents. The white card base is layered with Kraft cardstock and then another white music-note embossed layer, two jingle bells, glitter, twine and a sentiment.
Another look:

Technical notes:


I recently participated in my very first (homemade/handmade/unique/custom-designed) Holiday card swap. Let me just tell you...I was a nervous wreck! I tend to be a bit OCD over things like this. My cards have to be perfect!
I made 10 of these babies for the swap. They are not my Holiday card this year as I want to send out photo cards, but I will use these for thank you's and other holiday-related gift giving.
So I labored and labored over my design and came up with this card:

I am in love with the white-on-white layering seen all over Pinterest and decided to throw in a bit of Kraft-colored accents. The white card base is layered with Kraft cardstock and then another white music-note embossed layer, two jingle bells, glitter, twine and a sentiment.
Another look:

Technical notes:
- The white embossed layer was made using a Cuttlebug embossing folder and my Epic Six.
- The jingle bells were cut using my Silhouette. They are cut in two layers and jazzed up a bit with Stickles Crystal.
- "JINGLE" sentiments are computer generated (x 10), cut with Stampin Up's (SU) Framelits Bitty Banners and the Revolution machine, enhanced with Gelly Roll pens (Red Star & Lime Star) and mounted on pop dots.
- Brown twine (Doodlebug) was strung up and glued under the sentiment.
- The inside "Jingle All The Way" is an older SU rubber mounted stamp and stamped with SU's Soft Suede ink


Aren't they fabulous?
Monday, December 3, 2012
DIY Scrapbook Coasters
Once again I participated in the Handmade Gift Exchange. This is my second one and they are lots of fun.
My "secret" recipient loves snowmen. So, I wanted to design a project around that fat, happy, round white guy. I also knew I wanted to make coasters, so I designed a 8" x 12" scrapbook page! I adhered the title and the stickers just like I would for my scrapbook (I might mention that an 8" x 8" scrapbook page would fit perfectly over four coasters).
Here's what you need for the coasters:
The first coat of Mod Podge goes directly on the tile.
Then, Mod Podge the
paper onto the tile, making sure to get it nice and smooth. Let dry. Give it a
second coating if you wish. I did two coats. I brushed each coat on in opposite directions.

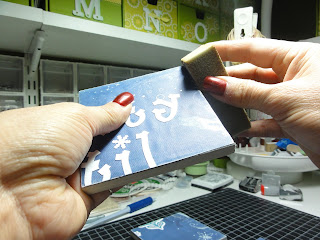
When the Mod Podge was dry, I distressed the edges with a sanding block just a bit.
I chose to "seal" mine with a clear spray sealer.

Finally, I added felt "bumper" pads to the bottom of the tiles -- no scratched furniture here.

There you have it. The coasters turned out adorable. These are perfect for a holiday party, kinda like a puzzle - interactive and functional! What d'ya think? Will my "secret" recipient like 'em?


My "secret" recipient loves snowmen. So, I wanted to design a project around that fat, happy, round white guy. I also knew I wanted to make coasters, so I designed a 8" x 12" scrapbook page! I adhered the title and the stickers just like I would for my scrapbook (I might mention that an 8" x 8" scrapbook page would fit perfectly over four coasters).
Here's what you need for the coasters:
- Mod Podge
- Paper/design/scrapbook page (your stash is waiting to be busted)
- 4" x 4" square tiles (any will do...look for the ones on clearance...I got grey slate tiles @ Home Depot for $.30/ea)
- Felt bumpers (optional, but you will want to protect the furniture!)
- Clear Acrylic spray (added protection for sweaty, drippy drink glasses)
 |
| Paper & Stickers: Echo Park Winter Wishes Title: Cut with my Silhouette |
 |
| Isn't that a nice crafting dish for Mod Podge? Red Solo Cup...I fill you up. |

When the Mod Podge was dry, I distressed the edges with a sanding block just a bit.

I chose to "seal" mine with a clear spray sealer.

Finally, I added felt "bumper" pads to the bottom of the tiles -- no scratched furniture here.

There you have it. The coasters turned out adorable. These are perfect for a holiday party, kinda like a puzzle - interactive and functional! What d'ya think? Will my "secret" recipient like 'em?


Imagine how cute these would be with a full-size, family portrait!
Wednesday, November 28, 2012
11-28-12 Sketch
This will be my last "professional" sketch for this Design Team @ Let's Scrap.

My term is officially ending; and next Wednesday, you will see a whole new crop of designers @ Let's Scrap. I have enjoyed my two back-to-back terms there immensely. I can't wait to see new, fresh ideas. I have loads of new cyber friends. We have supported each other through many of life's blessings and tragedies these past eight months. I will miss our daily dialog...but I will be lurking! I just might be back sometime next year hopefully in a renewed DT capacity...but, in the meantime, look for several new sketches I designed for Let's Scrap to appear in the coming months. Jus' sayin.
Anywho...here is today's sketch:

And here is my take on it:
Some close up detail:

Here are the technical notes for the layout:
My term is officially ending; and next Wednesday, you will see a whole new crop of designers @ Let's Scrap. I have enjoyed my two back-to-back terms there immensely. I can't wait to see new, fresh ideas. I have loads of new cyber friends. We have supported each other through many of life's blessings and tragedies these past eight months. I will miss our daily dialog...but I will be lurking! I just might be back sometime next year hopefully in a renewed DT capacity...but, in the meantime, look for several new sketches I designed for Let's Scrap to appear in the coming months. Jus' sayin.
Anywho...here is today's sketch:

And here is my take on it:
 |
| 2011 Candlelight Dinner |

Here are the technical notes for the layout:
- This entire LO evolved from the beautifully embellished blue menu that was on our table.
- The sketch calls for a large vertical photo on the lh side. Hmmm...I think that is the perfect place to include the menu!
- The LO also calls for three, 2" x 3" vertical photos. I replaced two of those with a 3" x 4" horizontal photo. All other photos are cropped as depicted in the sketch.
- The title is a custom design (from yours truly) and cut from white cardstock using my Silhouette machine.
- The LO called for several embellishments around the title. I cut a 12" x 12" patterned paper just off center and used the snowflake/ornaments printed on the paper in place of the embellies.
- The two snowflakes on the lh side are punches. They are "strung" with mini pearls, embellished with a jelly roll star pen with large center pearls. They match the paper fabulously...if I do say so myself!
- All other paper, die cut ribbon, and layered embellies are from the new Creative Memories "Be Merry" collection. "Pssst...there is a beautiful red album that matches the paper!"
- The journaling on the rh side is computer generated in coordinating colors...of course.
Monday, November 19, 2012
Dear Santa


Wednesday, November 14, 2012
11-14-12 WINNING Sketch!
Remember the sketch contest over @ Let's Scrap?
I'm so very proud to finally be able to announce my winning sketch! It is featured this week for 4,200+ Let's Scrap members! Woo hoo!

This was an entirely different excercise for me. I have NEVER designed a sketch first. I always start with some piece of a layout that I want to use, be it the photos, patterned paper or a really cute embellishment.
So, after looking through oodles of photos, I settled on a layout about Gracie (no surprise there. Are you tired of her yet?).
 |
| Gracie is part Golden Retriever; and boy, does she like to retrieve and retrieve and retrieve! |
Close-up detail:


Here are the technical notes:
- All of the octagons were hand cut @ 3"
- The octagons were distressed (inked) with brown ink
- The pawprint heart was cut on my Silhouette
- Additional journaling was added to the pawprint
- The title box and journal boxes are word "clouds" generated on wordle.net, printed on white cardstock, hand cut, and mounted on pop dots. I cannot tell you how much I love this web based word generator! I have used it for cards, holidays, blog art, etc. Try it...you will love it! DISCLAIMER: you may get hooked.
Saturday, November 3, 2012
Handmade Gift Exchange: Holiday 2012
Remember the Handmade Gift Exchange I participated in this past summer? Click here to refresh your memory. It was so much fun!
Here's what I got in the exchange.

My gift was perfect for me 'cause I DON'T SEW! Can't wait to put my new pillow covers out with my holiday decorations!
The Holiday version of the gift exchange is now open for registration. It's so much fun! Please join me. Here's a few of the particulars:
This
is the 7th Handmade Gift Exchange
Registration
closes on November 7, 2012 at midnight. On
November 8, 2012, you will get an email from Elfster informing you of your assignment. You will only be able to view
your partner info during the exchange. Once the exchange is over on November 30,
your partner will not have access to your information on Elfster.Frequently Asked Questions
- There is no
skill level required. A
handmade gift is always wonderful, no matter how technical it is!
- There is no
price minimum on the handmade gift. If shipping costs are an issue,
you can make a gift that is light weight and fits inside an envelope.
- You do not
need a blog to participate!
- How will I know
who my partner is? You will get an email on November 8, 2012 with your
assigned person’s name and information.
- There is no
official theme for this Gift Exchange. If you feel so inclined to do a
Christmas theme, go for it!
- Can I make a
gift from a kit/pattern?
YES!! If you made any part of the gift, that’s perfect!
- Can the gift be
in digital form?
No. You can create a printable or graphic for your partner, but please
PRINT it off and send a physical copy to your partner. Part of the fun
is actually physically receiving a gift in the mail.
JOIN
ME. SIGN UP!
For
my international friends, please note that there are five different exchanges:
USA, Canada, UK, Australia, and All Countries. Use the drop down box to make
your selection!
Click the widget below to get started. Can't wait to see all of the handmade creations!
Subscribe to:
Posts (Atom)


