Wednesday, December 26, 2012

12/26 Sketch @ Let's Scrap

Happy Day After!!!!!!!!!!

I hope your Christmas was fabulous.  I hope you were able to focus on your family.  I hope you ate so much you are stuffed.  I hope you smiled so much your cheeks hurt.  I hope you took way too many pictures (like I did)!  I hope Santa was good to you, and I hope the mess is not TOO big!  (Santa was EXTRA good to me this year.  He always is, but I am really liking my BIG gift...more to come!)

I am so proud to announce that the weekly Wednesday sketch @ Let's Scrap is mine!  Do you remember the sketch contest?  My very first attempts at scrapbook layout design not only produced a winner, but I also had lots of runners-up; and this is the first of many more to come over the next few months.


I love, LOVE, all of the chalkboard designs and fonts that I have been seeing.  I really wanted to use that premise for a layout (LO).  The stark white fonts against the black or very center paper would be perfect for a back-to-school LO, Christmas program, or any school-age theme.  Only trouble on my end is that I don't have school-aged children any more, but I do have a furry toddler named Gracie Lou.  So here's my take on the sketch:

Gracie was such a good student!
She even Graduated and got her very own diploma!
And some close-up detail:

Technical notes:
  • Patterned paper:  Echo Park Woof! collection.
  • Large white Puppy title:  Doodlebug Design Sew Simple Cardstock Stickers
  • Woof & Bark are fussy cut from the pattterned paper and mounted on pop dots
  • Kindergarten title:  Cut on my Silhouette
  • Yellow washi tape:  Queen & Co.
  • Computer journaling:  Font KG Makes You Stronger (white type on black banners) and fussy cut
  • Cardstock:  Creative Memories White & Black
So happy to be back with a layout for Let's Scrap...this will surely be my last LO for 2012.  I will be participating in the January LOAD challenge.  Join me!

I have completed a whopping 235 LO's in 2012!!  Oh my gosh, the photos, the stories, and the memories are all documented.

Monday, December 24, 2012

Merry Christmas

A very Merry Christmas to all of my "virtual" friends.  I feel very fortunate to have you drop in now and again and visit my blog, leave a comment, share a craft or two, a recipe or three, and general life craziness.  I hope you gather an ounce of inspirateion after a visit here...I really do love to share! 


If you've been here before, you know I love to share the "technical" notes:
  • This is not an original photo idea.  I stole it.  If you've ever seen the opening segment of the Modern Family TV show you will know where this comes from. 
  • I bought a white 11" x 14" open back frame from Hobby Lobby.
  • Bill and I each posed in front of the Christmas tree holding the frame.
  • Getting a good photo of Gracie was the hardest part.  She HATED her Christmas hat and would NOT close her mouth!
  • I then worked some Photoshop Elements magic with the three photos.
    • I first opened the photo of me, "magic erased" the part of my shirt inside the frame.  Once you erase part a photo, it acts just like a picture frame.
    • Then, I "placed" the photo of Gracie under the "erased" part just so and then flattened and saved a new image of the two of us.
    • I  then opened the photo of Bill and did the same "magic erasing" inside the frame area.  I then "placed" the picture of me and Gracie underneath Bill's photo. 
    • Once again, I flattened the image and saved it as a new .jpg.
  • The finished card is a 6" x 7 1/2" Costco card, the entire "chalkboard" sentiment is theirs.  I just uploaded my finished "altered" photo of the three of us and added our Christmas message.
  • Here's a commercial for Costco and a personal testiment:  Costco's cards are awesome!  They are extra large and 50 cards is only $14.99 with silved lined envelopes.  What a deal!
I do hope you enjoy the card and a mini Photoshop lesson.

May your Christmas holiday be blessed with friends and family.  Here's hoping that you take as many photos as I do and that we have lots to scrap in 2013!

Tuesday, December 18, 2012

Blowing my own horn!

Woot!  Woot!

My gift for the recent handmade gift exchange was highlighted today over @ Craftaholic's Anonymous! 

Check it out:


I'm feelin a bit "celebrity-ish."

Saturday, December 15, 2012

Some exciting news...

Click to play this Smilebox slideshow

Just call me...
 
GRANDMA!!


Thursday, December 6, 2012

Holiday Card Swap

Got your Holiday cards made yet?  If not, read on for some inspiration.

I recently participated in my very first (homemade/handmade/unique/custom-designed) Holiday card swap.  Let me just tell you...I was a nervous wreck!  I tend to be a bit OCD over things like this.  My cards have to be perfect! 

I made 10 of these babies for the swap.  They are not my Holiday card this year as I want to send out photo cards, but I will use these for thank you's and other holiday-related gift giving.

So I labored and labored over my design and came up with this card:

I am in love with the white-on-white layering seen all over Pinterest and decided to throw in a bit of Kraft-colored accents.  The white card base is layered with Kraft cardstock and then another white music-note embossed layer, two jingle bells, glitter, twine and a sentiment. 

Another look:


Technical notes:
  • The white embossed layer was made using a Cuttlebug embossing folder and my Epic Six.
  • The jingle bells were cut using my Silhouette.  They are cut in two layers and jazzed up a bit with Stickles Crystal.
  • "JINGLE" sentiments are computer generated (x 10), cut with Stampin Up's (SU) Framelits Bitty Banners and the Revolution machine, enhanced with Gelly Roll pens (Red Star & Lime Star) and mounted on pop dots.
  • Brown twine (Doodlebug) was strung up and glued under the sentiment.
  • The inside "Jingle All The Way" is an older SU rubber mounted stamp and stamped with SU's Soft Suede ink
Here are the cards I received in the swap.  I hope that they spark some ideas!  Enjoy.


Aren't they fabulous?

Monday, December 3, 2012

DIY Scrapbook Coasters

Once again I participated in the Handmade Gift Exchange. This is my second one and they are lots of fun.

My "secret" recipient loves snowmen.  So, I wanted to design a project around that fat, happy, round white guy.  I also knew I wanted to make coasters, so I designed a 8" x 12" scrapbook page!  I adhered the title and the stickers just like I would for my scrapbook (I might mention that an 8" x 8" scrapbook page would fit perfectly over four coasters).

Here's what you need for the coasters:
  1. Mod Podge
  2. Paper/design/scrapbook page (your stash is waiting to be busted)
  3. 4" x 4" square tiles (any will do...look for the ones on clearance...I got grey slate tiles @ Home Depot for $.30/ea)
  4. Felt bumpers (optional, but you will want to protect the furniture!)
  5. Clear Acrylic spray (added protection for sweaty, drippy drink glasses)
Cut the paper design of your choice (it doesn't have to be a scrapbook page) to fit your tiles. I cut mine a little shy of 4" because I did not want the paper to hang over the edge of the tile.

Paper & Stickers:  Echo Park Winter Wishes
Title: Cut with my Silhouette
The first coat of Mod Podge goes directly on the tile.

Isn't that a nice crafting dish for Mod Podge?
Red Solo Cup...I fill you up.
Then, Mod Podge the paper onto the tile, making sure to get it nice and smooth. Let dry. Give it a second coating if you wish. I did two coats.  I brushed each coat on in opposite directions.


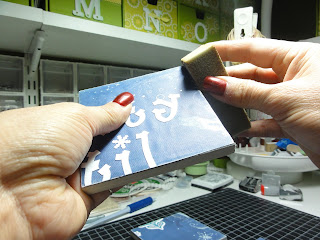
When the Mod Podge was dry, I distressed the edges with a sanding block just a bit.


I chose to "seal" mine with a clear spray sealer.


Finally, I added felt "bumper" pads to the bottom of the tiles -- no scratched furniture here. 


There you have it.  The coasters turned out adorable.  These are perfect for a holiday party, kinda like a puzzle - interactive and functional!  What d'ya think?  Will my "secret" recipient like 'em?


Imagine how cute these would be with a full-size, family portrait!